
安装 Jonot
所有 Jonot 原生应用都可以从
downloads.jonot.io 下载。每个版本都有不变的带版本号归档路径,以及随每次发布更新、缓存时间较短的 latest/ 路径。
Jonot Host
Section titled “Jonot Host”Jonot Host 应用运行在后台办公的 Linux 机器上,在断网期间保持排队运行,并在连接恢复后自动同步。
| 软件包 | 链接 |
|---|---|
Debian / Ubuntu(.deb) | jonot-host-linux.deb |
Fedora / RHEL(.rpm) | jonot-host-linux.rpm |
通过 apt 安装(Debian / Ubuntu)
Section titled “通过 apt 安装(Debian / Ubuntu)”一次性添加 Jonot 软件源,之后用 apt upgrade 更新:
curl -fsSL https://downloads.jonot.io/host/latest/jonot-host-public.asc \ | sudo gpg --dearmor -o /usr/share/keyrings/jonot-host.gpgecho "deb [signed-by=/usr/share/keyrings/jonot-host.gpg] https://downloads.jonot.io/host/apt stable main" \ | sudo tee /etc/apt/sources.list.d/jonot-host.listsudo apt update && sudo apt install jonot-host通过 dnf/rpm 安装(Fedora / RHEL)
Section titled “通过 dnf/rpm 安装(Fedora / RHEL)”一次性添加 Jonot 软件源,之后用 dnf upgrade 更新:
sudo rpm --import https://downloads.jonot.io/host/latest/jonot-host-public.ascsudo tee /etc/yum.repos.d/jonot-host.repo <<'REPO'[jonot-host]name=Jonot Hostbaseurl=https://downloads.jonot.io/host/rpmenabled=1gpgcheck=1repo_gpgcheck=1gpgkey=https://downloads.jonot.io/host/latest/jonot-host-public.ascREPOsudo dnf install jonot-hostmacOS 和 Windows
Section titled “macOS 和 Windows”| 软件包 | 链接 |
|---|---|
macOS(.dmg) | JonotHost-latest.dmg |
Windows(.msi) | JonotHost-latest.msi |
macOS 和 Windows 版本会自动检查更新(macOS 使用 Sparkle,Windows 使用
WinSparkle),每次安装前都会请你确认。Linux 的 .deb / .rpm 软件包通过上面配置的 apt/dnf 软件源更新。首次打开 macOS 版本的方法见
macOS:首次打开应用。
桌面版 Jonot Kiosk·Desk·Display 客户端
Section titled “桌面版 Jonot Kiosk·Desk·Display 客户端”Kiosk、Desk 和 Display 也有适用于 Windows、macOS 和 Linux 的原生桌面客户端。它们在嵌入式 Chromium 浏览器引擎中显示 Web 应用。引擎在首次运行时下载一次。桌面客户端支持与 Web 应用相同的品牌、语言和实时更新。
Kiosk 客户端通过网络或 USB 连接的 ESC/POS 小票打印机打印排队号。支持的打印机见定制自助终端。Desk 不打印排队号;当门店的 Kiosk 打印机离线时,它会显示一条横幅提示。Kiosk 和 Desk 客户端会在断网时切换到门店内的主机。浏览器不支持这些功能。Kiosk 还会全屏运行、阻止常见快捷键,并要求输入 PIN 才能退出。Display 仅用于输出,不打印,也不要求 PIN 退出。在 macOS 和 Windows 上,它会在你登录时自动启动,并保持屏幕常亮。在 Linux 上,你打开它一次后,它会在 GNOME 和 KDE 上自动启动,阻止系统休眠,并请求 GNOME 和 KDE Plasma 保持屏幕常亮。在其他桌面环境中,或者屏幕仍然变为空白时,你可能需要自行关闭屏幕空白和屏幕锁定,见保持显示屏常亮。为了让显示屏在断电后恢复,请将设备设置为自动登录显示屏所用的账户。
Kiosk、Desk 和 Display 客户端每天自动检查一次更新。任何客户端都不会自行安装更新,每次安装都必须由操作员确认:
- macOS — Sparkle 发现更新。Desk 和 Display 显示更新横幅。Kiosk 以全屏模式运行,因此在 PIN 保护的管理员菜单中显示更新。你可以选择安装更新,或推迟更新。如果在更新下载前推迟,客户端会在下次检查时再次提供该更新。如果在更新下载后推迟,Sparkle 可能会在客户端下次退出时安装它。
- Windows — WinSparkle 会询问一次是否允许自动检查更新。它在你第二次打开客户端时询问,而不是第一次。如果你拒绝,客户端不会检查更新,你必须从本页安装新版本。允许后,有可用更新时 WinSparkle 会显示自己的更新窗口。如果安装程序提示文件正在使用,请关闭客户端后继续。要关闭 Kiosk,请在其管理员菜单中选择退出自助终端。
- Linux — Desk 和 Display 显示更新横幅,Kiosk 在管理员菜单中显示安装更新操作。客户端会下载新的
.deb或.rpm,进行验证,在系统软件包安装程序中打开它,然后退出。安装完成后,请重新打开 Kiosk、Desk 或 Display。如果 Display 在安装完成前已重新打开,请重启 Display 或电脑,使其运行新版本。如果没有打开任何软件包安装程序,或者该账户无法安装软件,请从本页下载软件包,并在终端中以管理员身份安装,例如sudo apt install ./jonot-kiosk-linux-amd64.deb或sudo dnf install ./jonot-kiosk-linux-amd64.rpm。Linux 桌面客户端没有 apt 或 dnf 软件源。
首次打开 macOS 客户端的方法见 macOS:首次打开应用。
Jonot Kiosk (desktop)
Section titled “Jonot Kiosk (desktop)”| 软件包 | 链接 |
|---|---|
macOS(.dmg) | JonotKiosk-latest.dmg |
Windows(.msi) | JonotKiosk-latest.msi |
Debian / Ubuntu(.deb,amd64) | jonot-kiosk-linux-amd64.deb |
Debian / Ubuntu(.deb,arm64) | jonot-kiosk-linux-arm64.deb |
Fedora / RHEL(.rpm,amd64) | jonot-kiosk-linux-amd64.rpm |
Fedora / RHEL(.rpm,arm64) | jonot-kiosk-linux-arm64.rpm |
Jonot Desk (desktop)
Section titled “Jonot Desk (desktop)”| 软件包 | 链接 |
|---|---|
macOS(.dmg) | JonotDesk-latest.dmg |
Windows(.msi) | JonotDesk-latest.msi |
Debian / Ubuntu(.deb,amd64) | jonot-desk-linux-amd64.deb |
Debian / Ubuntu(.deb,arm64) | jonot-desk-linux-arm64.deb |
Fedora / RHEL(.rpm,amd64) | jonot-desk-linux-amd64.rpm |
Fedora / RHEL(.rpm,arm64) | jonot-desk-linux-arm64.rpm |
Jonot Display (desktop)
Section titled “Jonot Display (desktop)”| 软件包 | 链接 |
|---|---|
macOS(.dmg) | JonotDisplay-latest.dmg |
Windows(.msi) | JonotDisplay-latest.msi |
Debian / Ubuntu(.deb,amd64) | jonot-display-linux-amd64.deb |
Debian / Ubuntu(.deb,arm64) | jonot-display-linux-arm64.deb |
Fedora / RHEL(.rpm,amd64) | jonot-display-linux-amd64.rpm |
Fedora / RHEL(.rpm,arm64) | jonot-display-linux-arm64.rpm |
如需为面向公众的安装提供防篡改保护,请在桌面版 Kiosk 之上叠加操作系统级别的 Kiosk 配置文件——参见锁定桌面版 Kiosk。
Windows:绕过安全警告
Section titled “Windows:绕过安全警告”Windows 的 .msi 安装程序尚未进行代码签名。在此之前,Windows 会显示
“未知发布者”。Microsoft Edge 和 Microsoft Defender SmartScreen 也会在首次下载和运行时阻止该文件。这些警告是因为安装程序较新且下载次数少,不代表文件已经损坏。
步骤 1——在 Microsoft Edge 中允许下载
Section titled “步骤 1——在 Microsoft Edge 中允许下载”Edge 最初会拒绝保留文件,并显示**“JonotDesk-x.y.z.msi 不常被人下载。打开之前请确认你信任它。”**(确切的文件名取决于你使用的链接——latest/
链接下载的文件名为 JonotDesk-latest.msi。)
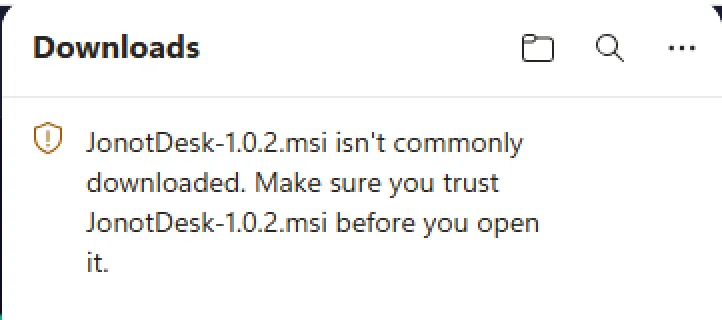
打开下载面板(工具栏中的 ↓ 图标),将鼠标悬停在被阻止的条目上,点击其旁边的**⋯(更多操作)按钮,选择保留**。
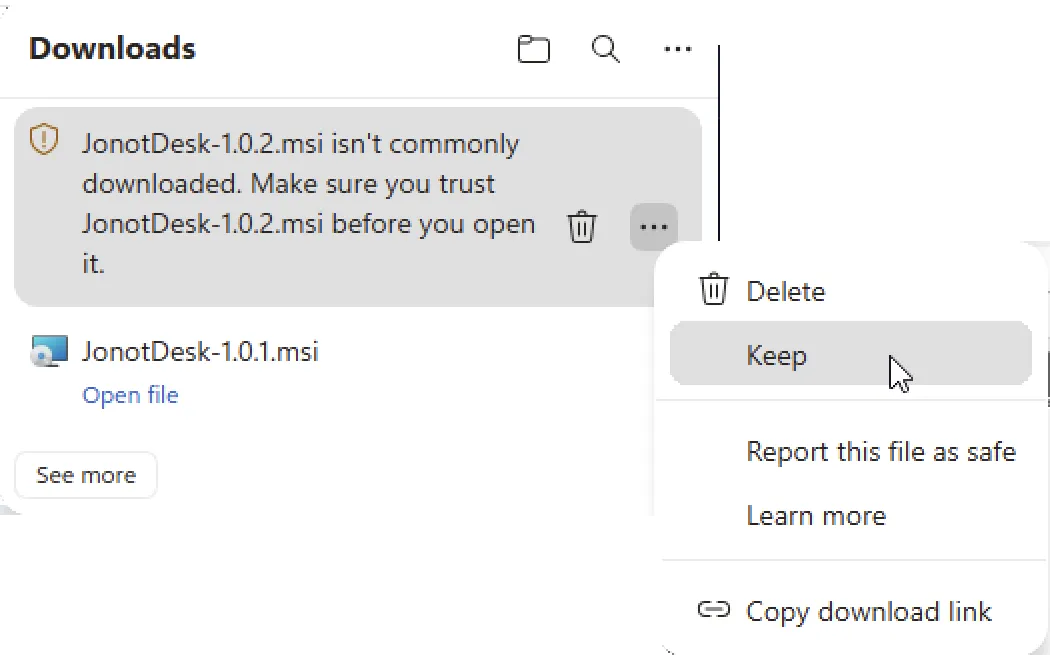
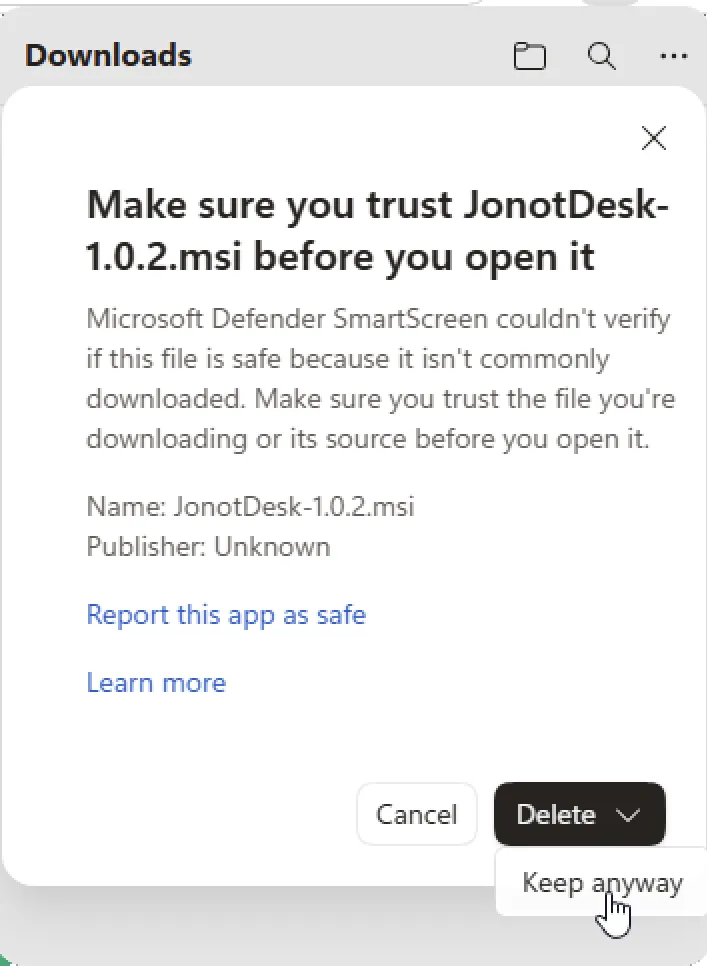
Edge 会再要求一次确认——“打开 JonotDesk-x.y.z.msi 之前,请确认你信任它。” 点击仍要保留按钮(可能需要展开拆分的删除按钮才能看到它)。
现在下载已被保留,并出现打开文件链接。点击它以启动安装程序。

步骤 2——让应用通过 SmartScreen
Section titled “步骤 2——让应用通过 SmartScreen”首次运行安装程序时,Microsoft Defender SmartScreen 会将其阻止,并显示 “Windows 已保护你的电脑……已阻止某个未知应用启动。” 仍要运行按钮是隐藏的——点击详细信息链接以显示它。
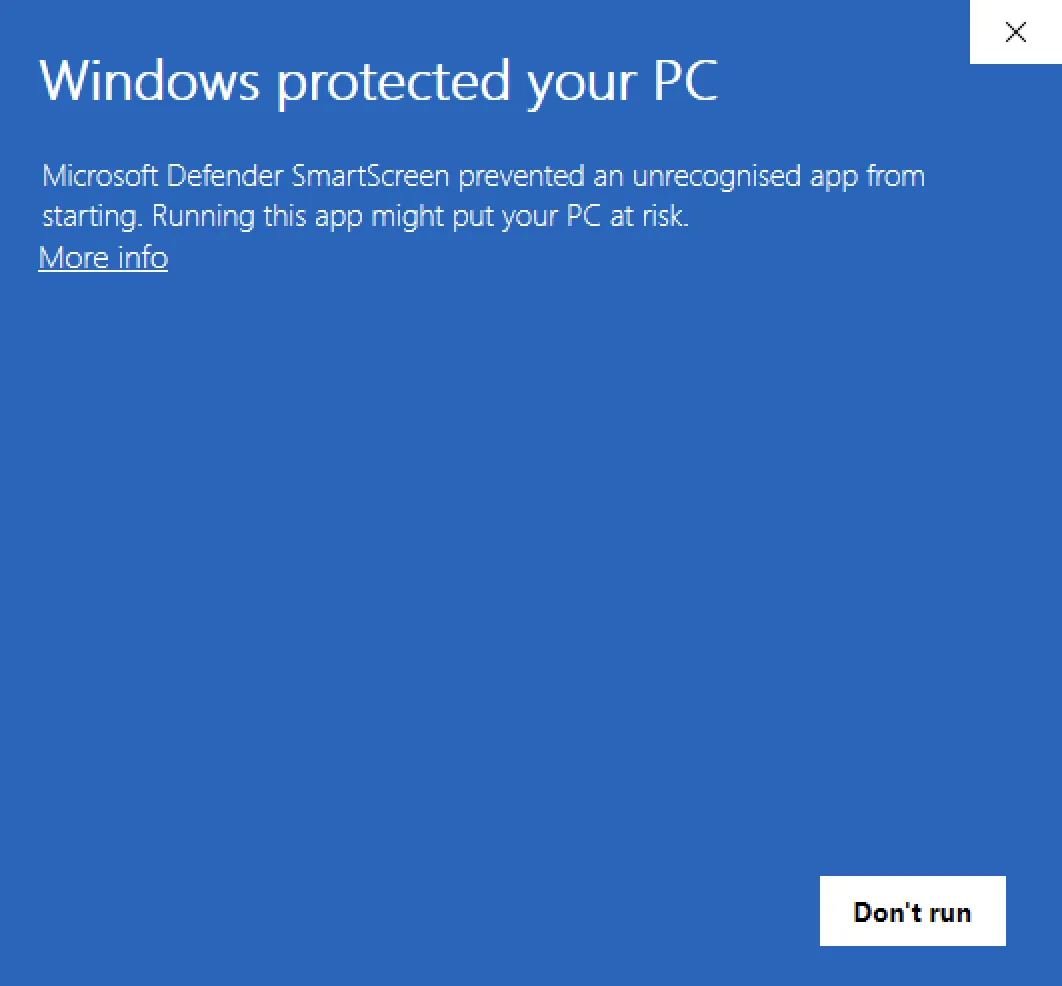
随后 SmartScreen 会显示应用名称和发布者,不运行旁边会出现仍要运行按钮。点击仍要运行以启动安装程序。
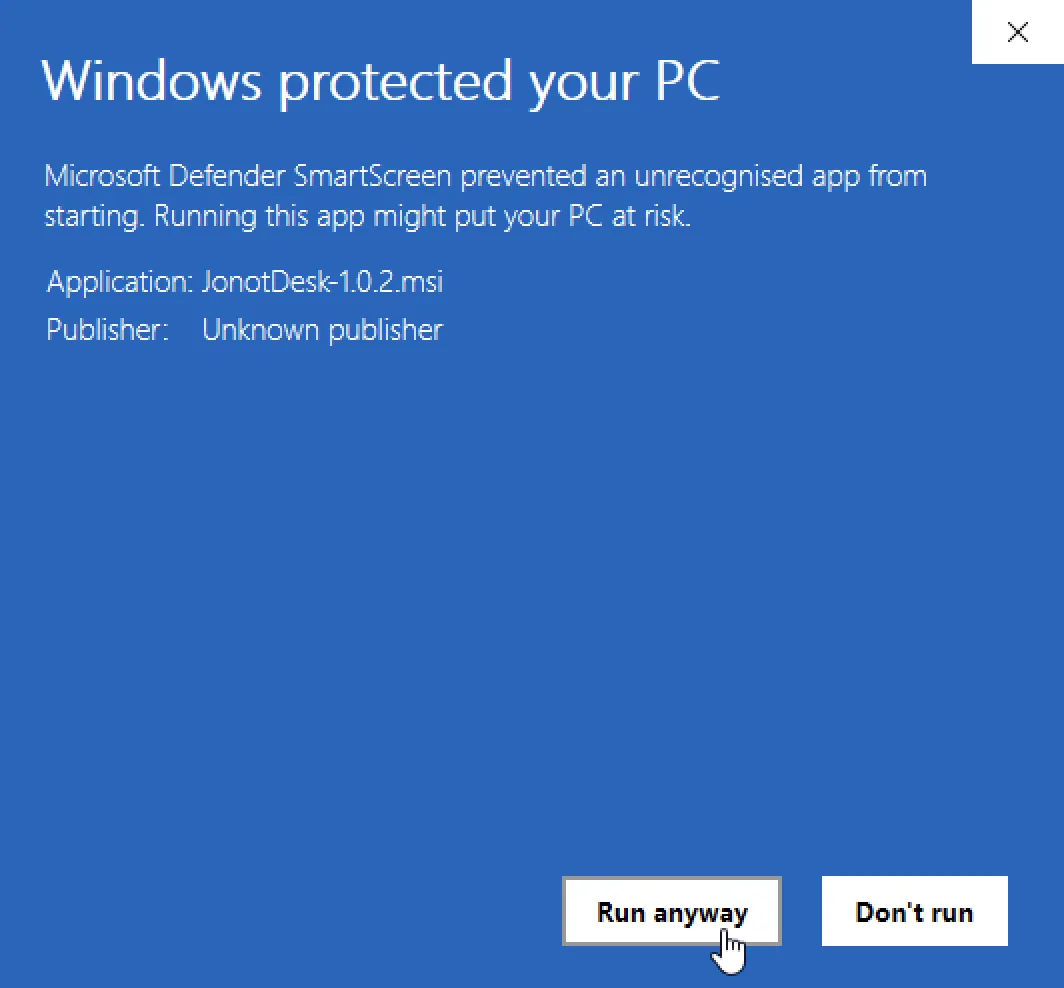
之后 MSI 安装程序将正常进行。你只有在下载并首次运行安装程序时才会看到这些提示——安装后的应用之后启动时不再出现。WinSparkle 提供的就地更新在浏览器外下载,因此跳过 Edge 的下载警告;但在应用积累足够的信誉之前, SmartScreen 仍可能对新安装程序提示一次。一旦安装程序完成代码签名且签名证书在 SmartScreen 中积累了足够的信誉,这两个提示都应停止出现。
macOS:首次打开应用
Section titled “macOS:首次打开应用”macOS .dmg 软件包尚未使用 Apple Developer ID 签名,也未经过 Apple 公证。每个应用改为使用临时(ad-hoc)签名。在此情况改变之前,macOS 会阻止首次启动,并提示无法验证该应用。出现此警告是因为 Apple 尚未检查该应用,并不表示下载的文件已损坏。
- 打开
.dmg,将应用拖到应用程序文件夹。 - 从应用程序中打开应用。macOS 提示无法验证该应用。点按完成。
- 打开系统设置并选择隐私与安全性。滚动到安全性部分,找到关于被阻止的 Jonot 应用的信息,然后点按仍要打开。如果没有显示仍要打开,请再次打开应用,并在一小时内返回此界面。
- 使用密码或触控 ID 确认,然后在随后出现的对话框中点按仍要打开。
在 macOS 14 及更早版本上,你也可以在应用程序中按住 Control 键点按该应用,选择打开,然后在对话框中点按打开。
macOS 会记住对已安装应用的这一选择,因此之后启动时不会再出现提示。只以这种方式允许 Jonot 应用。不要为整台 Mac 关闭 Gatekeeper。
Android 应用
Section titled “Android 应用”Jonot Kiosk (Android)
Section titled “Jonot Kiosk (Android)”平板自助取号终端。
| 安装方式 | 链接 |
|---|---|
| Google Play(推荐) | 在 Google Play 上获取 |
| 直接下载 APK(本地部署 / MDM) | jonot-kiosk.apk |
Jonot Desk (Android)
Section titled “Jonot Desk (Android)”用于呼叫和管理排队号的工作人员服务台应用。
| 安装方式 | 链接 |
|---|---|
| Google Play(推荐) | 在 Google Play 上获取 |
| 直接下载 APK(本地部署 / MDM) | jonot-desk.apk |
Jonot Display (Android)
Section titled “Jonot Display (Android)”面向电视、显示器和平板的纯输出排队显示屏,包括 Android TV 和 Fire TV。
| 安装方式 | 链接 |
|---|---|
| Google Play(推荐) | 在 Google Play 上获取 |
| 直接下载 APK(本地部署 / MDM) | jonot-display.apk |
验证你的下载
Section titled “验证你的下载”桌面版 Host、桌面版 Kiosk、桌面版 Desk 和桌面版 Display 各自在其
<app>/latest/ 路径下发布自己的 SHA256SUMS / SHA256SUMS.asc /
Jonot<App>-public.asc(例如 host/latest/jonot-host-public.asc、
kiosk/latest/JonotKiosk-public.asc、desk/latest/JonotDesk-public.asc、
display/latest/JonotDisplay-public.asc)。四个都由同一个 Jonot 发布 GPG
密钥签名(C2EF 70E9 7821 0056 C5C8 2F42 E588 CB26 8697 F7C3)。分离签名位于 SHA256SUMS.asc 中。验证签名可证明校验和文件由 Jonot 发布;校验和则证明你下载的二进制文件与发布的内容一致。
SHA256SUMS 列出了 .deb、.rpm 和 .msi 文件,但不包括 .dmg,因此
sha256sum -c --ignore-missing 不覆盖 .dmg。.dmg 未经公证,其临时(ad-hoc)签名也不能表明 Jonot 是发布者。请只从 downloads.jonot.io 下载 .dmg。
以下步骤以 Host 为例。其他应用请替换为 kiosk、desk 或 display
(以及 JonotKiosk-public.asc、JonotDesk-public.asc 或
JonotDisplay-public.asc)。
步骤 1——下载校验和文件与公钥
Section titled “步骤 1——下载校验和文件与公钥”curl -fsSLO https://downloads.jonot.io/host/latest/SHA256SUMScurl -fsSLO https://downloads.jonot.io/host/latest/SHA256SUMS.asccurl -fsSLO https://downloads.jonot.io/host/latest/jonot-host-public.asc步骤 2——导入并验证密钥指纹
Section titled “步骤 2——导入并验证密钥指纹”gpg --import jonot-host-public.ascgpg --fingerprint C2EF70E978210056C5C82F42E588CB268697F7C3指纹必须与 C2EF 70E9 7821 0056 C5C8 2F42 E588 CB26 8697 F7C3 完全一致。如果不一致,请丢弃该下载。
步骤 3——验证校验和文件的签名
Section titled “步骤 3——验证校验和文件的签名”gpg --verify SHA256SUMS.asc SHA256SUMS你应该看到 Good signature from "Jonot Release <releases@jonot.io>"。
步骤 4——验证你下载的文件
Section titled “步骤 4——验证你下载的文件”sha256sum -c SHA256SUMS --ignore-missingOK 结果确认文件完好无损。
各版本的发布说明见Host 变更日志。所有原生应用的版本也列在 GitHub Releases 页面上。